I came home to the unfamiliar sight of a dark LED on one of my home dev nodes. This box is basically always on serving Jupyter notebooks to any of my friends who want to play around. I clicked the power button; it boots straight to bios; using an SSD as my boot drive had finally bit me in the butt! And then it hit me, that sinking feeling when I realize I am, once again, going to have to install device drivers, CUDA, cuDNN and TensorFlow onto a fresh install of Ubuntu.
Each time I explain or perform TensorFlow/Driver setups the phrase, “And then you insert the nuclear launch codes while simultaneously rotating both keys with your two free legs” seems to come to mind
This has always been a bit of a rite of passage for every Machine Learning/Computer Vision expert who employs GPU based model training. In my career as a Computer Vision Scientist, I’ve probably had to do this or explain this process 30 times. Each time I explain or perform TensorFlow/driver setups the phrase, “And then you insert the nuclear launch codes while simultaneously rotating both keys with your two free legs” seems to come to mind. Therefore, I’ve decided to try to make a go at documenting exactly what is needed and where it can be found. In this process we’ll discuss:
- Dependencies: How the different required dependencies are related
- Goals: What target information you need to understand before starting
- Procedure : How do I go about installing everything and checking it is right
1.0: Dependencies
- GPU Device Drivers: The kernel code that allows the CPU to communicate with the GPU on the PCI express bus. Different GPU’s could very well use different driver code and those different driver codes are tracked with version coding.
- GPU Compute Capability: The Version of software and hardware feature set that determines what versions of CUDA code can be executed on the device
- CUDA Tool Kit: The environment that is used to produce high performing GPU- accelerated applications. It manages all of the parallelization software that runs on the GPU and makes sure that it is running as smoothly as possible so you don’t have to!
- cuDNN: The NVIDIA CUDA® Deep Neural Network library (cuDNN) is a GPU-accelerated library of primitives for deep neural networks. cuDNN provides highly tuned implementations for standard routines such as forward and backward convolution, pooling, normalization, and activation layers.
- TensorFlow: The deep learning framework google provides so that users no longer have to write their own deep learning/back propagation/neural network modules from scratch. Some components of TensorFlow are not compatible with all versions of CUDA and so its important to keep track of this as well.
With a field that is as rapidly evolving as deep learning, these five components are always improving. Sometimes, one of these components might make older versions of other components obsolete as they improve.
2.0: Goals
Its important to know what questions to ask before we start installing packages so that we install the right ones and don’t have to backtrack or erase incorrect installations. From the beginning we need to ask:
- What version of TensorFlow do I need?
- What version of CUDA is required?
- Which drivers do I need to support CUDA?
- What drivers are available on my GPU?
- What compute capability does my GPU have?
- How does that impact what versions of CUDA I can run?
By answering these questions we should have a complete list of requirements for installation!
2.1: What version of TensorFlow do I need?
This is a really tricky question! I tend to try to use the latest possible if I’m embarking on a new project. However, if you’re already working off of some models that have already been developed in a different major revision of TensorFlow (1.X vs 2.x) then you might not be able to use a different version without doing some serious retraining or code refactoring. TensorFlow follows the versioning protocol MAJOR.MINOR.PATCH:
- MAJOR: Potentially backwards incompatible changes. Code and data that worked with a previous major release will not necessarily work with the new release. However, in some cases existing TensorFlow graphs and checkpoints may be migratable to the newer release; see Compatibility of graphs and checkpoints for details on data compatibility.
- MINOR: Backwards compatible features, speed improvements, etc. Code and data that worked with a previous minor release and which depends only on the non-experimental public API will continue to work unchanged. For details on what is and is not the public API, see What is covered.
- PATCH: Backwards compatible bug fixes.
2.2: What Version of CUDA is Required?
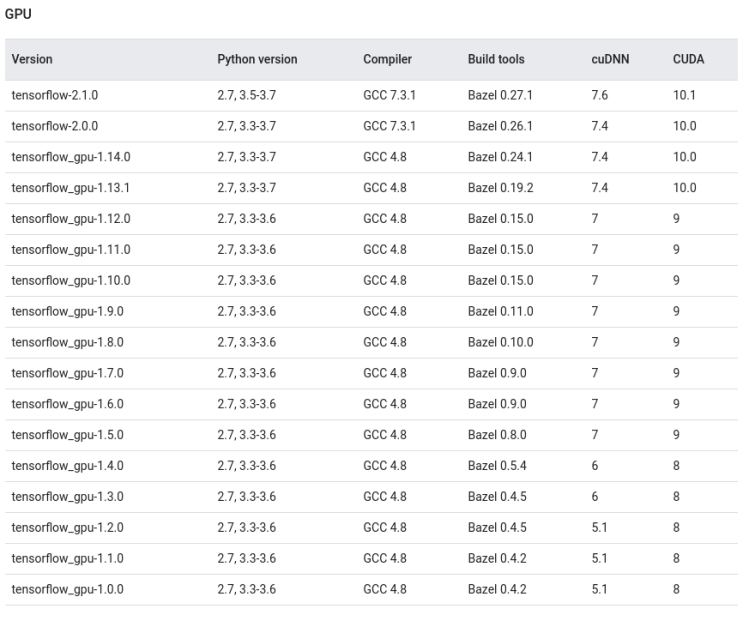
When we’ve selected a version of TensorFlow that we’d like to use, it has some implications as to what versions other software has to take on. Notably, make sure that you have a compatible version of Python, GCC, and CUDA installed. For example, if I am trying to use TensorFlow 2.1, I would require
- Python 2.7 or 3.5-3.7
- GCC 7.3.1
- cuDNN 7.6
- CUDA 10.1
The reason the CUDA version is particularly important is because I need to verify that my GPU has driver versions installed that are compatible with that version of CUDA
2.3: Which Drivers do I need to Support CUDA?

CUDA has very strict driver requirements in order to run properly. In my example, of using TensorFlow 2.1 I was forced to use CUDA 10.1 and therefore, I will require drivers of at least version 418.39 in order to function properly.
2.4: What drivers are available on my GPU?
Ubuntu 18.04 has a really nice utility called Software & Updates that has an “Additional Drivers” tab. It will tell you what drivers are available for your card that can be installed. In my case, I have access to 435, 390, and 430. In my example, I required a minimum driver version of 418.39 and so I can select 430 in order to meet that requirement. It used to be a lot harder to figure out what drivers I had available for my GPU!

You might be in a circumstance where you don’t have advanced enough drivers for the TensorFlow version you wish to use. This could be driven by the fact that your particular GPU isn’t high enough in Compute Capability to support the version of CUDA and TensorFlow you wish to use.
2.4.1: What Compute Capability Does my GPU Have?
The Linux lspci command can be used to determine what gpu is available on your PCI express bus.
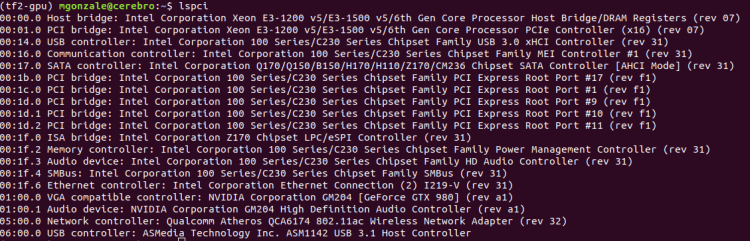
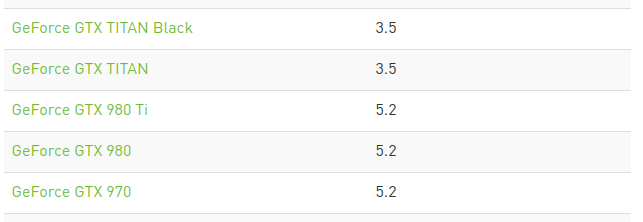
When I run lspci on my box I can see in the line fourth from the bottom that I have access to a GeForce GTX 980. This can be cross referenced against the compute capability chart on nVidia’s website to determine the compute capability of my GPU
2.4.2: How Does that Impact Driver Availability?
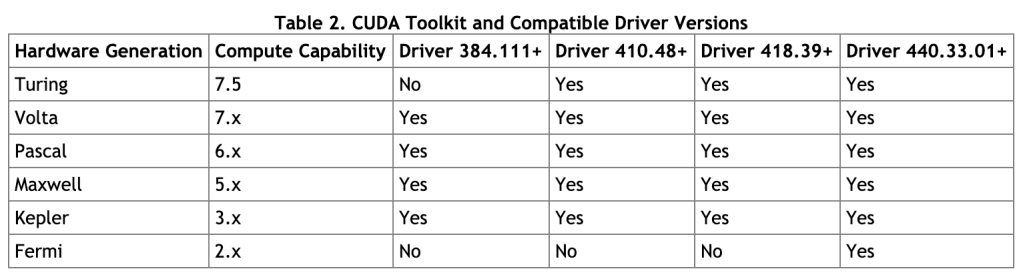
This table will allow us to move our drive our TensorFlow selection process from the bottom up. We can see what GPU we have -> determine the best driver -> determine CUDA version -> determine TensorFlow Version.
3.0: Procedure
If you have been following above then you will know exactly what versions of each library we wish to install. In our example this means we will install:
- Nvidia Driver 430
- CUDA 10.1
- cuDNN 7.6
- Python 3.7
- GCC >= 7.3.1
First make sure that you’ve properly installed the correct versions of Python and GCC. We wont cover that here because there are plenty of examples on the internet.
Then we can install the Nvidia Driver 430 via the Software & Updates -> Additional Drivers. After the installation is complete, you will be required to reset the system. Once that is done you can check your installation using the nvidia-smi command

Notice that the Software & Updates package already installed the correct version of CUDA for you. If you ever want to check that the correct version of CUDA Is installed, you can check here or use the nvcc –version command. Other note-able things about nvidia-smi is that it shows you the GPU, its power consumption, memory utilization, device driver version, and even the CUDA version!
You could also install CUDA yourself by visiting the website and downloading and running the run file:
sudo sh cuda_X.X.XX_XXX.XX_linux.run
Finally, you can download and install cuDNN by downloading it here following this procedure
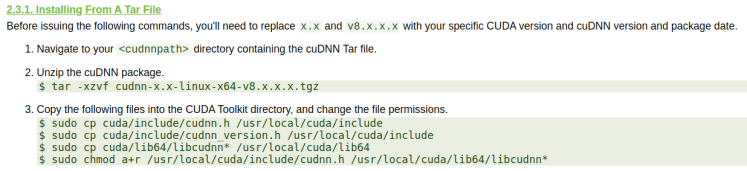
You may have to change some things in the path depending on where you installed cuda. Sometimes cuda is installed in /usr/lib/ as opposed to /usr/local/ . You can check your installation by using
cat /usr/local/cuda/include/cudnn.h | grep CUDNN_MAJOR -A 2
To check your installation is working well open up python and try this test code!
# In Tensorflow 1.X
import tensorflow as tf
with tf.compat.v1.Session() as sess:
   sess = tf.compat.v1.Session(config=tf.compat.v1.ConfigProto(log_device_placement=True))
# In Tensorflow 2.X
import tensorflow as tf
with tf.Session() as sess:
   sess = tf.Session(config=tf.ConfigProto(log_device_placement=True))
Now you should be good to rock and roll! All you need is to get rolling with MiniKF or microk8s!

Helpful post – we need to read more like this, as most info about this topic is lacking something. You give real insight to your readers.
LikeLike